Blend modes are formulas that decide how the pixels on one layer mix with the pixels on the layers underneath, and knowing how to use blend modes for photo editing is mostly about three things: keeping the original safe, choosing a mode that matches the effect you want, and dialing the strength back with opacity and a mask. It takes about ten minutes for a first effect once you know where the setting lives.
I spent years clicking through the blend mode list with no idea what anything did, cycling past Color Dodge and Vivid Light without a reason. Then a retouching course explained neutral colours in about five minutes and the whole menu made sense. Nobody taught me that part, and it is the part that actually matters.
Table of Contents
- What You Need
- Step-by-Step: How to Use Blend Modes for Photo Editing
- 1. Duplicate the image, then pick the mode that matches your effect
- 2. Add an adjustment layer for the effect
- 3. Lower opacity until the effect supports the subject
- 4. Mask the effect to the areas that need it
- 5. Combine modes when one is not enough
- 6. Refine colour and contrast after the modes are set
- 7. Use blend modes for the effects photographers need most
- 8. Check the result at different sizes, then export
- Common Mistakes
- Frequently Asked Questions
- What are blend modes in Photoshop and why should I use them?
- Which blend modes should a beginner learn first?
- What is the difference between Overlay and Soft Light?
- Can blend modes replace adjustment layers?
- Why does my blend mode effect look too strong?
- Can you use blend modes in Lightroom or on a phone?
What You Need
You need a photo editor with layers. Photoshop is the obvious one, but Affinity Photo, Pixelmator Pro, Krita and GIMP all ship the same blend mode families, and mobile apps such as Snapseed and Lightroom Mobile cover the most useful ones too. Menu names differ slightly between apps, so treat the exact wording as a guide rather than gospel.
Here is what actually needs to be ready before you start:
- A working copy. Duplicate your background layer first so the original pixels are never at risk.
- Adjustment layers. Curves, Levels, Hue and Saturation, Black and White. These are what generate the effect, and a blend mode only decides how that effect merges with the image.
- A layer mask. Alt-click (or Option-click) the mask icon under the active layer to create a black-and-white mask.
- A soft brush. A large soft round brush, low flow, is what you use to paint the effect back in where you want it.
- A habit of checking the original. Toggle the layer group on and off while you work so you can see what the mode is actually doing.
Nothing here is destructive as long as you leave the base image alone. That is the whole idea: blend modes exist so you can push an image hard and still back it out.
Step-by-Step: How to Use Blend Modes for Photo Editing
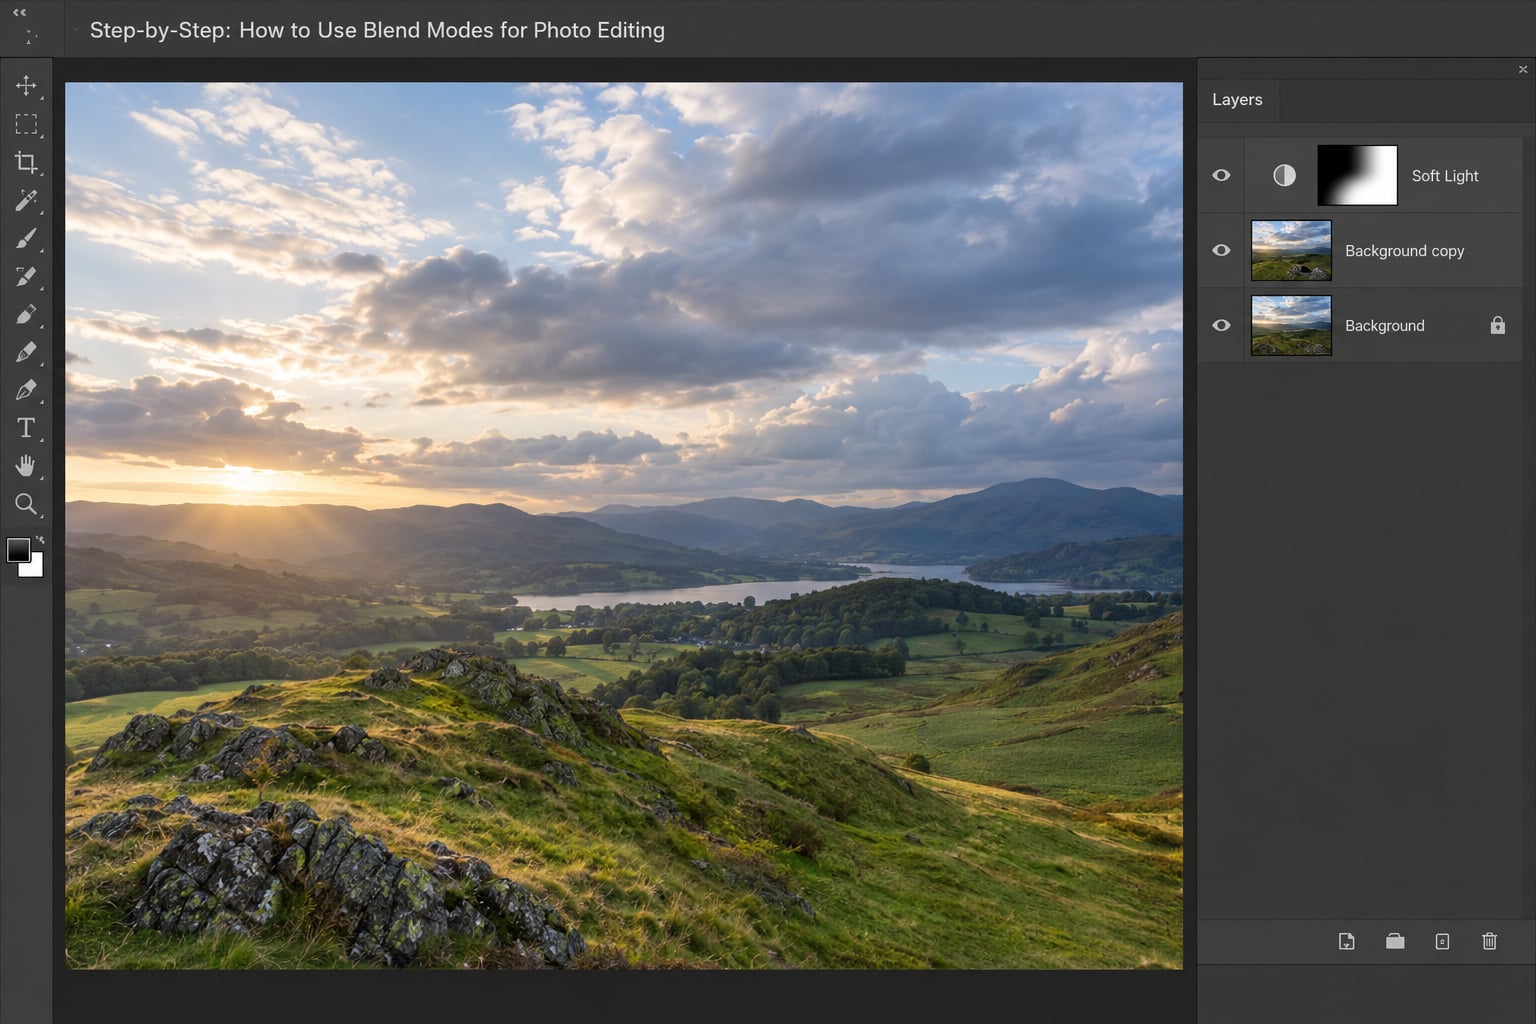
The workflow below works the same whether you are brightening a dull sky, matching two shots for exposure, or cleaning up a portrait. Follow it in order and each step explains how to tell it worked.
1. Duplicate the image, then pick the mode that matches your effect
Start on a duplicated background layer, set the mode, and judge it there. White on Multiply, black on Screen, or mid-grey on Overlay and Soft Light, that middle-ground logic is how you choose in about five seconds instead of cycling through the whole list.
Flip between Normal and the chosen mode a few times with the backslash key in Photoshop. The layer stays editable the whole time, so nothing is baked in. If you are working in another editor, the duplicate-and-toggle habit is identical even though the shortcut differs.
2. Add an adjustment layer for the effect
Put the adjustment layer above the photo, then change the blend mode on that adjustment layer rather than on the pixels themselves. Curves and Levels shift contrast and tone, Hue and Saturation shifts colour, and Black and White converts the layer to a greyscale version that other modes can work with.
This is the step beginners skip, and skipping it is why their blend mode results look pasted on. An adjustment layer feeding a blend mode behaves like a slider you can still adjust tomorrow.
3. Lower opacity until the effect supports the subject
Drag the opacity down in small increments, usually to somewhere between 20 and 60 percent, and watch the whole frame rather than one corner. Skin tones are the first thing to give out, so if a portrait starts looking flushed or chalky, back the opacity off further.
Fill is the second slider on the same layer, and it behaves differently for the modes that have a Fill control. Opacity fades the whole layer, fill fades the colour and texture while letting the underlying contrast show through. For most photographs opacity alone is enough.
4. Mask the effect to the areas that need it
A blend mode across the entire frame is almost never what you want, so add a black layer mask and paint the effect in with a soft white brush. Shadows, highlights, a background, one cheek, or the sky only, these are the usual targets.
Work at low flow with several passes rather than one heavy stroke. You will know the mask is right when the transition between treated and untreated areas is invisible at normal viewing size.
5. Combine modes when one is not enough
Two or three blend mode layers is a normal finished edit. A typical stack sits like this: a Curves layer in Soft Light for overall contrast, a Hue and Saturation layer in Color for grading, and a retouch layer in Luminosity for dodging and burning.
Stack order matters. The layer directly above your photograph drives the others, so when two layers fight each other, hide the top one and check whether the layer underneath is producing a better base.
6. Refine colour and contrast after the modes are set
Once the structure is in place, correct what the blend modes changed. A Hue and Saturation layer on Color mode fixes a cast, Color Balance or a Curves layer on Luminosity brings skin back to normal, and a final Curves pass on Normal tidies the global contrast.
Compare against the original on a neutral monitor if you have one. Most monitors lean cool, and that is where over-corrected blues creep in.
7. Use blend modes for the effects photographers need most
A short list covers most real work. Multiply darkens two exposures together or removes a white background. Screen lightens two exposures or knocks out a black background. Overlay and Soft Light add contrast and colour to a greyscale or tone layer. Color takes hue and saturation from the layer above while keeping luminosity from below. Luminosity does the reverse.
Beyond the standard cases, Soft Light over a 50 percent grey layer is the classic dodging and burning setup, High Pass filtered layer in Linear Light gives you detail sharpening without visible halos, and a Multiply or Overlay layer holding a scanned texture or film grain adds bite to a flat digital file. Krita users hit a known quirk where blend modes inside a group stop behaving, and the fix is to pull those layers out of the group or set the group to Pass Through.
8. Check the result at different sizes, then export
Zoom to 100 percent and inspect the masked edges, then shrink the window to a thumbnail and look again. Texture and subtle effects that look right zoomed in often vanish or get noisy at small sizes.
Flatten a copy for delivery, not the working file, and keep your layered version. A flattened PNG keeps only what you could see, so any blend mode you had hidden underneath is gone, which is the export complaint that comes up again and again on the Photoshop and Affinity forums. Save the layered file as PSD or a format your next editor can open.
Common Mistakes
These six errors account for most bad blend mode results, and each one has a straightforward fix.
- Too many layers. Six blend mode layers on one photo usually means you are compensating for a bad base edit. Fix: flatten your adjustments into two or three layers that each do one job.
- No mask. A blend mode applied to the whole frame flattens your tones and drags skin colour with them. Fix: add a black layer mask and paint the effect into the areas that need it.
- Opacity left at 100 percent. The effect looked strong in the panel, so you accepted it. Fix: drop to 40 percent and judge the frame rather than the layer.
- The wrong mode for the tones. Multiply crushes already-dark shadows into solid black, which is where clipped shadows come from. Fix: check the histogram, and switch to Soft Light or Overlay for a gentler darkening.
- Ignoring skin tones. Color and Hue modes carry the strongest saturation and will exaggerate any colour problem in the face. Fix: desaturate the skin first with a targeted mask, then reapply the mode.
- Never checking at small sizes. The edit looks convincing at full screen and rough on a phone. Fix: zoom out before you export, every time.
A few habits that make the rest easier: name your layers so you know what each one does a month later, keep all blend mode layers inside a group so you can collapse the stack when you want the plain original, and remember that most working photographers only use five to eight modes regularly despite there being more than two dozen on the menu.
Frequently Asked Questions
What are blend modes in Photoshop and why should I use them?
Blend modes are formulas that decide how the pixels on one layer combine with the pixels on the layers beneath it, channel by channel. Multiply darkens, Screen lightens, and Overlay adds contrast based on how light or dark the layer above it is. You use them because they are non-destructive: you can push an effect hard, watch the whole frame, and dial it back with opacity or a layer mask at any point without touching the original pixels.
Which blend modes should a beginner learn first?
Multiply, Screen, Overlay, Soft Light, Color and Luminosity cover almost everything a photographer needs, and most working editors use about six of them. Learn those first and the rest of the menu becomes reference material rather than a puzzle. Colour Dodge, Vivid Light and Linear Burn sound useful but you will rarely reach for them in a portrait or a landscape workflow.
What is the difference between Overlay and Soft Light?
Both belong to the contrast group, but they differ in strength. Overlay pushes hard, multiplying or screening at full intensity based on the tone of the layer above, so a grey layer on Overlay behaves like a stronger version of its own tone. Soft Light applies the same idea gently, which is why it is the default choice for dodging and burning on a 50 percent grey layer.
Can blend modes replace adjustment layers?
No, they do different jobs. An adjustment layer generates the change, in tone, colour or greyscale, and the blend mode decides how that change merges with the photograph underneath. Using a blend mode on a plain pixel layer still works, but the result is harder to tune later because you are moving painted pixels instead of a slider.
Why does my blend mode effect look too strong?
Three usual reasons. Your opacity is still near 100 percent, your layer has no mask so the mode is hitting every pixel, or the mode itself is aggressive for that part of the tone range, such as Multiply crushing shadows to solid black. Drop the opacity in small steps, add a black layer mask and paint the effect into the areas you want, then swap to Soft Light if the contrast is the real problem.
Can you use blend modes in Lightroom or on a phone?
Lightroom Classic and Capture One do not have traditional layer blend modes because they are raw converters built around sliders, so you look for equivalents instead: masking, the dodge and burn tools, and Color Grading. Mobile apps do have them. Snapseed offers double exposure modes that behave like Multiply and Screen, and Lightroom Mobile exposes blend modes on masks for dodging and burning on a phone.
Start with one duplicated layer, one Curves adjustment, Soft Light, and opacity around 40 percent, then mask it into a single area. Once that feels natural, add a second mode and you are editing the way the workflow is meant to be used.