Learning how to remove a background in Photoshop is mostly about picking one of three routes: the automatic Select Subject button for clean, simple edges, the Select and Mask workspace when hair or fine detail is involved, or the Magic Wand and Pen tools when the background is a single flat colour. Duplicate your layer first, refine the selection, then hide the background with a layer mask so you can bring it back later.
Most people get a usable result in about two minutes with the automatic tool. What takes longer is the last 20 percent — the strands of hair near the ear, the pale fringe where the old wall colour bled into the edge. That part is where this walkthrough spends most of its time.
Table of Contents
- What You Need Before You Start
- Step-by-Step: How to Remove a Background in Photoshop
- 1. Duplicate the Image and Select the Main Subject
- 2. Refine the Selection With Select and Mask
- 3. Choose a New Background and Place the Subject
- 4. Check and Clean the Edges on the Cutout
- 5. Add a Layer Mask Instead of Deleting
- 6. Save and Export the Finished Cutout
- Common Mistakes and the Fix for Each
- Tips for Cleaner Photoshop Cutouts
- Frequently Asked Questions
- How do I remove a background in Photoshop without losing hair?
- What is the fastest way to remove a Photoshop background?
- Should I save a background-removed image as PNG or JPEG?
- Why does my Photoshop cutout have rough or jagged edges?
- Can I remove a background from a low-resolution image in Photoshop?
- How do I fix a residual halo around a subject after background removal?
- Conclusion
What You Need Before You Start
You need a current desktop version of Photoshop with the Properties panel open. In a default workspace it sits under the menu bar on the right, above the Adjustments and Layers panels; if it is missing, use Window > Properties.
Your photo needs enough resolution for the size you plan to use. A cutout cannot invent detail that was never captured, and this is the single biggest limit on low-resolution files.
Make a working copy. Double-click the Background layer in the Layers panel or click the padlock icon to convert it to a regular layer, then drag it below the original and hide the original. Every step from here happens on the copy.
Have a new background ready to go. A solid colour layer made from the foreground colour (press X to swap black and white, then Alt/Option + Backspace to fill) is enough for a quick test.
Step-by-Step: How to Remove a Background in Photoshop
1. Duplicate the Image and Select the Main Subject
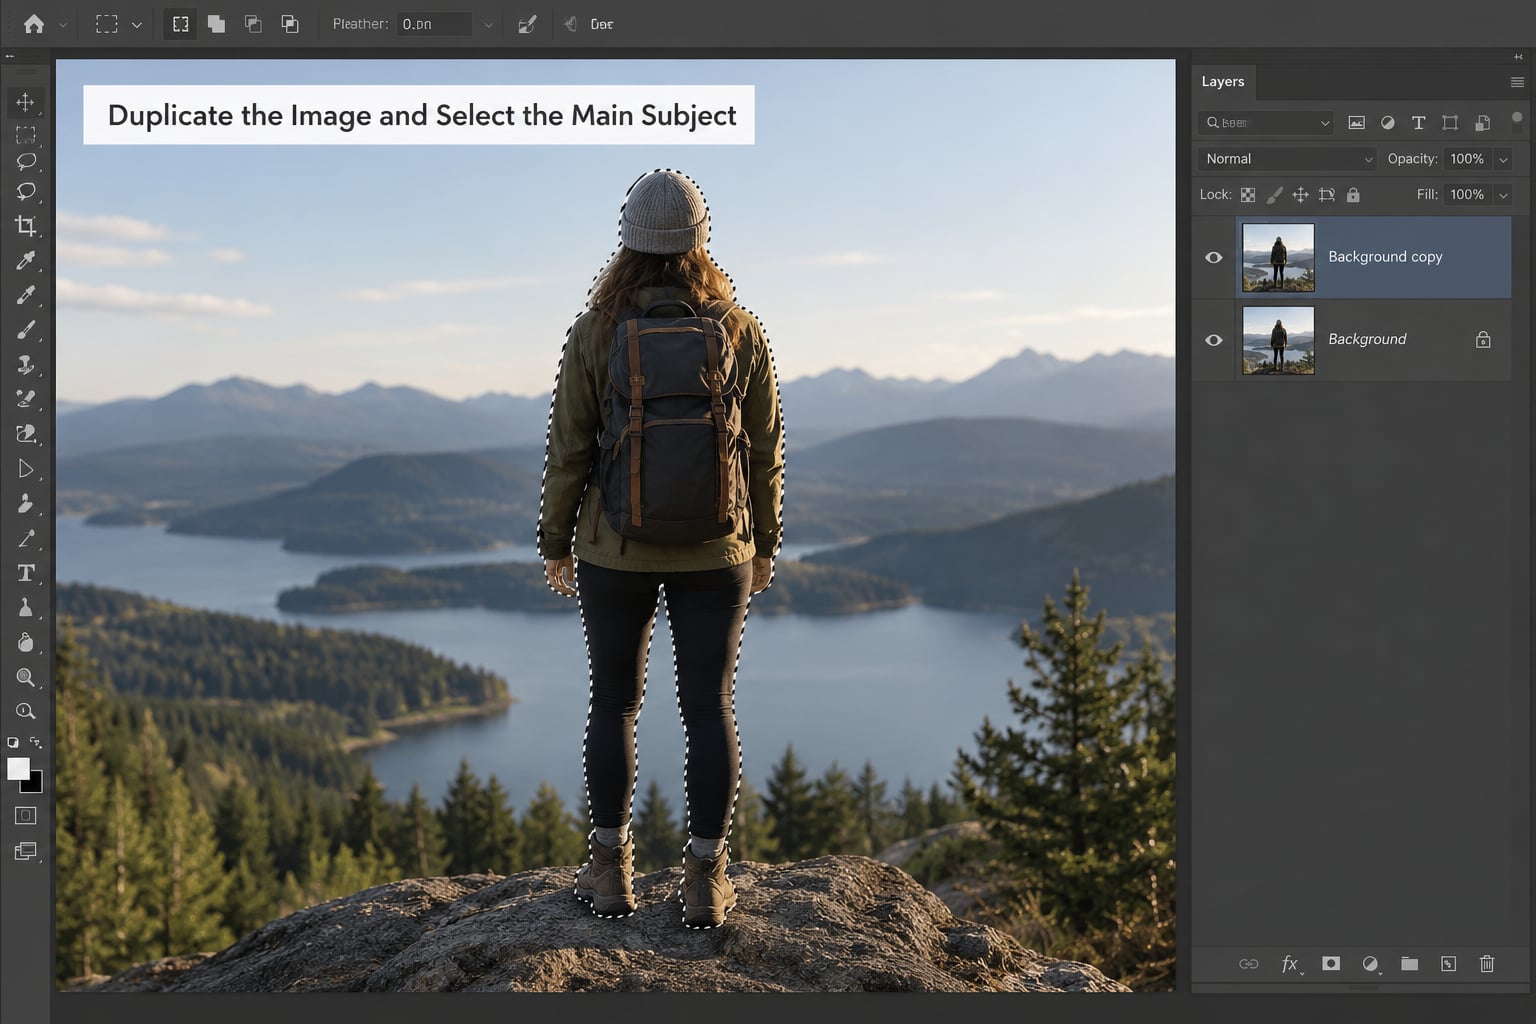
Click your duplicated layer so it is the active one, then open the Properties panel and click the Refine Selection button at the bottom, or use Select > Subject directly from the menu. Both run the same machine-learning selection.
You are looking for marching ants tracing the subject with no chunks of background inside it and no background clinging to the edges. Where the subject touches the frame, select Sample All Layers in the options bar before you run the command.
If the automatic pick misses a section entirely, do not fight it. Paint that area in with the Brush tool on a white layer, then run Select Subject again. Sometimes giving the tool a cleaner, higher-contrast input does more than any slider.
2. Refine the Selection With Select and Mask
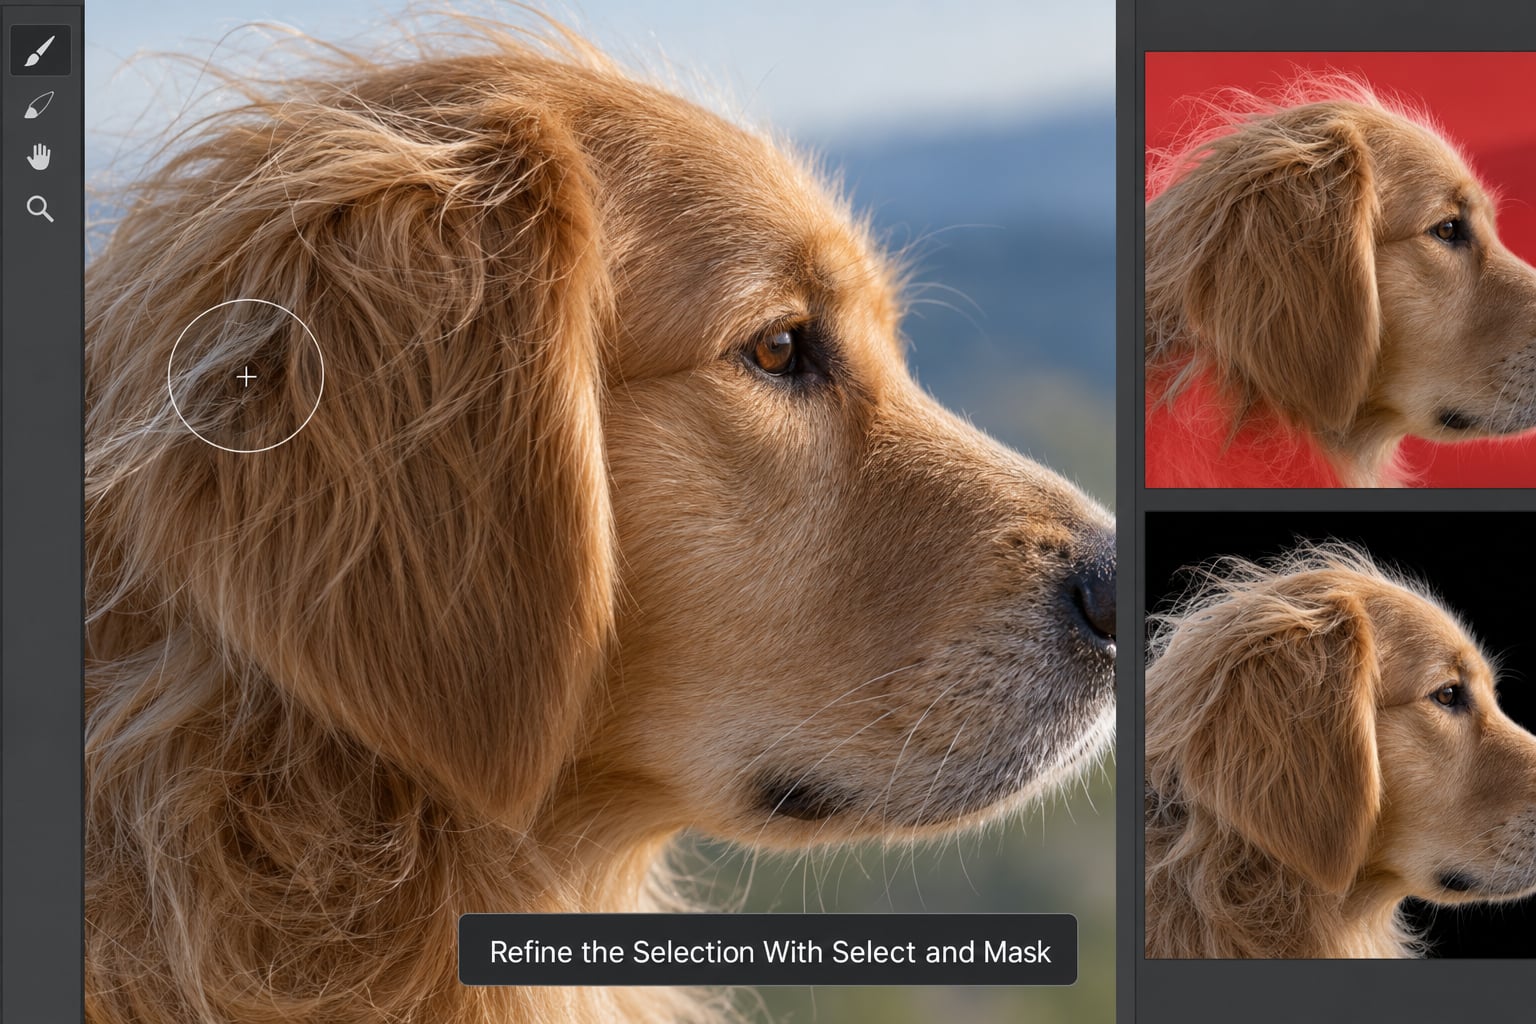
Go to Select > Select and Mask. This workspace is the reason a Photoshop cutout looks believable, so it is worth learning even if you mostly use the one-click button.
Set View Mode to On Black first. Light strands and pale edges disappear against black, so anything you can still see is real leftover background. Switch to Overlay when you want to see the selection boundary itself.
Choose the Refine Edge Brush from the tool strip on the left. Set Size to roughly the width of the hair, tick Smart Radius, and stroke from the edge outward onto the background. Small circles paint in, Alt/Option-click strokes remove.
The five sliders at the bottom do different jobs and people confuse them constantly:
- Smooth reduces the jagged pixel staircase on hard edges by 1 to 3 pixels.
- Feather softens the transition. Zero or 1 pixel for products, 2 to 3 for hair, more if you are compositing onto a matching scene.
- Contrast hardens a selection that Select Subject blurred too much. Push it to 15 or 20 for clothing and edges against a busy background.
- Shift Edge moves the boundary inward or outward. Negative values eat into the subject and can pull the selection off fine detail, so use small steps.
Tick Decontaminate Colors and set it around 5 percent when the original background colour has bled into the edge. It does nothing on a white studio background, but it rescues portraits shot against green screens where the spill sits in the hair.
Tick Output To and choose Layer Mask or New Layer With Layer Mask, then click OK.
3. Choose a New Background and Place the Subject
With the mask applied, press Ctrl/Cmd + I to invert it so the background rather than the subject is hidden. Then add a new layer below your subject for the replacement background.
For a solid colour, fill the new layer with your foreground colour. For a photo, drag it into the tab as a new layer, then use Ctrl/Cmd + T for Free Transform. Hold Shift while dragging a corner handle to keep the proportions locked; the checkmark or Enter commits it.
If the subject looks wrong against the new background, that is usually scale or perspective rather than the cutout. Match the size to something in the frame — a door handle, a standard brick — and the illusion holds.
4. Check and Clean the Edges on the Cutout
View the cutout at 100 percent on at least two backgrounds: a light one and a dark one. A halo that vanishes against white will glow against black, and that is the test that catches most of them.
Fix leftovers on the mask rather than on the pixels. Select the mask thumbnail, press X to swap your colours so black is active, and paint over anything that should not be there. Black hides, white restores, and your original pixels stay recoverable underneath.
For a soft residual glow, drop a Curves adjustment layer above the subject, clip it to the subject layer with Alt/Option + click between the layers, then pull the black point up slightly until the halo disappears. For a hard bright fringe, select the subject layer, add a black layer mask, and use Filter > Other > Minimum with a radius near 1 pixel.
Zoom to 300 or 400 percent and step along the edge. Hard-edged subjects such as bottles, watches and cutlery show mistakes immediately; hair hides them until the image is scaled up.
5. Add a Layer Mask Instead of Deleting
Deleting the background throws the pixels away permanently. A layer mask does the same job visually while keeping every original pixel, which is why most retouchers work this way and why so many people on photography forums ask whether the mask is really needed. It is, once you might want to change your mind.
Hold Alt/Option and click the Add Layer Mask button at the bottom of the Layers panel. The mask starts white and hides nothing. Paint black on it to hide the background, white to bring any part back.
If you already deleted pixels somewhere in the process, go back one step with Ctrl/Cmd + Z. Photoshop cancels an entire delete, including the pixels, so there is almost always a way back.
6. Save and Export the Finished Cutout
For a transparent file, use File > Export > Export As, name it with a .png extension, and set the resolution to match where it will be used — 72 ppi for web composites, 300 ppi if a printer will handle the file.
Leave RGB colour and 8-bit unless the client asks otherwise. Check the preview: if you see a grey-and-white checkerboard where the background was, the transparency is genuinely there.
Save the layered working file as a .psd first. Exporting to PNG flattens everything to one layer, so keep the editable version somewhere you can find it.
A JPEG cannot hold transparency. It fills the transparent areas with white or black, which is why forum questions about “my background came back” almost always come down to the file format rather than the cutout.
Common Mistakes and the Fix for Each
The Remove Background or Select Subject command is greyed out. Your layer is still a locked Background layer. Double-click it in the Layers panel and the command becomes available. This is the single most common reason the automatic tool “does not work”.
Hair is cut off in chunks or blades. The selection was never refined. Open Select and Mask and work the Refine Edge Brush with Smart Radius on, starting with 2 to 3 pixels of Feather rather than zero.
A bright or dark fringe follows the outline. Background colour is still mixed into the edge pixels. Turn on Decontaminate Colors, or use the Curves clipping trick described in Step 4.
Patches of background remain inside the subject. Select Subject found holes. Paint them in on a white layer first and rerun the selection, or fix them by hand on the mask.
Choppy, flickering edges when the image is scaled. Too little feathering. On hair, move Feather to 2 or 3 pixels; on a hard product edge, try a small amount of Contrast instead.
The subject looks stretched or wrong in the composite. A Free Transform scale issue, not a cutout issue. Undo, hold Shift, and resize again.
Tips for Cleaner Photoshop Cutouts
Preview on a contrasting background from the start. Checking only on the grey checkerboard hides most errors.
Work at 100 percent zoom. Refining at a zoomed-out view is how edges end up jagged when you look closely later.
Use a modest feather — 1 pixel for products, 2 to 3 for people — and reach for Contrast before you reach for a bigger feather number.
Keep the original layer visible at low opacity under the cutout. Comparing the two while you work catches drift that a single view hides.
Try Select > Color Range when the background is a single flat colour. It is faster than the Magic Wand on studio shots and gives a cleaner initial selection.
Frequently Asked Questions
How do I remove a background in Photoshop without losing hair?
Start with Select Subject, then open Select and Mask and switch View Mode to On Black so pale strands stand out. Use the Refine Edge Brush with Smart Radius ticked, sizing the brush to the width of the hair, and add 2 to 3 pixels of Feather. Avoid Shift Edge, which pulls the boundary inward and clips fine detail. Tick Decontaminate Colors if the background colour has bled into the hair.
What is the fastest way to remove a Photoshop background?
Click Select Subject on the Properties panel with the layer unlocked, then add a layer mask. That takes roughly two seconds and handles clean edges such as products, clothing and simple portraits. For anything with hair, fur or fine texture, plan on five more minutes in Select and Mask fixing the last 20 percent. The automatic button gets you most of the way; it does not get you the whole way.
Should I save a background-removed image as PNG or JPEG?
PNG, if you need a transparent background. JPEG cannot store transparency, so it flattens the cutout onto a solid colour, usually white, and the background appears to come back when you open the file. Use File Export Export As and choose PNG at 72 ppi for web work or 300 ppi for print. Keep a layered PSD alongside it so you can revise the mask later.
Why does my Photoshop cutout have rough or jagged edges?
Jagged edges usually mean the selection was made at a zoomed-out view and never refined, or that Feather is set to zero. Open Select and Mask, switch View Mode to On Black, and apply 1 pixel of Smooth plus 2 to 3 pixels of Feather. For soft subjects such as fur or hair, raise Contrast slightly instead of adding more Feather. If edges flicker when you scale the image, the feather value is too low for that subject.
Can I remove a background from a low-resolution image in Photoshop?
Yes, but the cutout will only be as good as the pixels you have. Selection tools pick up existing detail, so a small file produces a soft, breaky edge you cannot repair without inventing detail. Work from the largest original you have, keep the export at the original resolution rather than upscaling, and use Select and Mask with a modest feather to hide the pixelation. Reshoot if a print-quality cutout matters.
How do I fix a residual halo around a subject after background removal?
A halo means background colour is still mixed into the edge pixels. Reopen Select and Mask, tick Decontaminate Colors and set it near 5 percent, then output to a new layer mask. If the halo persists, add a Curves adjustment layer above the subject, clip it to the subject, and raise the black point until the glow disappears. On hard-edged products, select the subject and apply Filter Other Minimum at about 1 pixel instead.
Conclusion
Duplicate the layer, run Select Subject, then open Select and Mask and finish the edges there. Preview on black, feather by 1 to 3 pixels depending on the subject, and hide the background with a layer mask rather than deleting it.
Beginners should spend their first session on Step 2. The automatic selection gets you most of the way in seconds, and Select and Mask is the part that decides whether the result looks believable when someone puts it on a new background.