An LED panel light is a flat, continuous source with an array of LEDs behind a diffuser, and portrait photographers use it as key, fill, hair or background light. To learn how to use LED panels for portraits, set the Kelvin value to match your room, dim the panel until skin reads correctly, place it about 45 degrees to one side and slightly above eye level, then add a reflector or second panel on the opposite side to lift shadows.
The reason people keep panels in their kit is that the light and the shadow are both visible before the shutter fires. With a strobe you set a ratio, fire a test, check the back of the camera and adjust. With a panel you walk over and look at the face.
That visibility is why panels get recommended constantly for headshots and small studio portraits, and it is also why they struggle with two specific jobs. More on that later, because knowing the limits first saves you from building a setup around the wrong tool.
Below is the setup I would build first if I were starting from nothing, plus the numbers to write on the wall. Everything here is brand-neutral, so it applies to a 6-inch pocket panel or a 2×1 studio panel. The plan below is current for 2026 and does not depend on any specific model.
Table of Contents
- What You Need to Use LED Panels for Portraits
- Panel size decides how soft the light looks
- Color temperature you can actually change
- Modifiers, stands and the rest
- How to use LED panels for portraits in a small room
- Step-by-Step: How to Use LED Panels for Portraits
- Step 1: Choose the Panel Settings
- Step 2: Position the Panel Relative to the Subject
- Step 3: Create Soft, Controlled Light
- Step 4: Balance the Panel with the Room
- Step 5: Set Camera Exposure and Focus
- Step 6: Check the Portrait and Refine
- Common Mistakes
- Frequently Asked Questions
- What is the basic light setup for portraits?
- How do I set up key light and fill light with LED panels?
- What is a disadvantage of using LED lights in photography?
- How far should an LED panel be from my subject?
- Can LED panels give soft light, and how do I make a panel softer?
- What color temperature should I set an LED panel to for portraits?
- Conclusion
What You Need to Use LED Panels for Portraits
You need far less than most gear lists suggest. One panel, one stand, one reflector and something to dim the room already covers eighty percent of portrait work. Extra lights only add shadows to manage and color temperatures to match.
Panel size decides how soft the light looks
Softness comes from the size of the light as your subject sees it, not from the wattage. A small panel a long way back can look softer than a large panel up close, because what matters is how large the source appears from the subject’s position. Photographers call this apparent source size.
| Panel size | How the light reads | Best portrait use |
|---|---|---|
| 6 inch pocket panel | Small source, defined edges | Fill, hair light, on-location touch-ups |
| 12 inch panel | Medium source, workable edges | Key light for head and shoulders at close range |
| 18 inch panel | Large source, forgiving shadows | Beauty and skin-focused portraits, single-panel setups |
| 2×1 foot panel | Very large, wraps the face | Low-contrast portraits, high-key commercial work |
If your panel has a grid or barn doors fitted, treat it as a smaller source for shaping purposes. A grid narrows the spread, and a tight spread at the same distance behaves like a smaller, harder light.
Color temperature you can actually change
Bi-color panels run roughly 2700K to 6500K, and that range is the single most useful feature for portraits. Daylight-balanced panels around 5000K to 5600K sit closest to what your eyes read as neutral in a bright room.
Full RGB panels give you colored gels without swapping anything, but for portraits the warm-to-cool dial usually matters more. Skin tone problems on cheaper panels usually come from low color rendering, not from the temperature control.
Modifiers, stands and the rest
- Light stand with a tilt head, and a sandbag on the base if the stand is tall.
- Diffusion fabric, or the panel’s own diffuser, for skin work.
- White reflector or foam board to lift the shadow side without a second light.
- Black foam core for negative fill when you want more contrast.
- Light meter, optional but it makes settings repeatable across panels.
- Camera control: manual exposure, a grey card, and a tripod when the panel is your only light.
Check whether your panel takes standard modifiers before you buy one. Panels with a Bowens-style mount accept softboxes and grids made for strobes, which widens what you can do later. Adhesive frames are fine for diffusion but usually not for anything else.
How to use LED panels for portraits in a small room
In a home or garage studio, the household bulbs fight your panel constantly. Mixed color temperatures make white balance drift every time you walk over and turn a lamp on. Two habits fix this: turn off every fixture you can, and set your white balance manually to the Kelvin value you dialled into the panel rather than leaving it on auto.
| Light role | Angle | Height | Distance | Power relative to key |
|---|---|---|---|---|
| Key | 45 degrees to one side | Slightly above eye level | About 3 feet from the face | 100 percent |
| Fill (reflector) | Opposite side | Chest level | 6 to 12 inches from the subject | Around 1 stop under key |
| Fill (panel) | Opposite side, wider | Eye level | Further than the key | 1 to 2 stops under key |
| Hair or rim | Behind and above | Crown height, pointing down | 2 to 4 feet behind | 1 to 2 stops over key |
Ratio matters more than wattage. A reflector sitting one stop under your key gives natural-looking contrast, and a fill panel set two stops under gives a firmer, more sculpted look. Forum discussions of panel kits keep circling the same point: beginners overpower the fill and end up with flat portraits that look duller than the window light they were trying to beat.
Step-by-Step: How to Use LED Panels for Portraits
Work through these in order. Each step has a quick check that tells you it worked before you move on.
Step 1: Choose the Panel Settings
Start at the warmest or neutral end of the range and settle on one Kelvin value for the whole shoot, usually between 5000K and 5600K for daylight-balanced work. Set your camera’s white balance to that same value with a grey card, then dial brightness in roughly 5 percent increments while watching the live histogram rather than the brightness of the panel itself.
Dimming down instead of closing down the aperture keeps your depth of field intact, which matters for a portrait where eyes and ears both need to be sharp.
Step 2: Position the Panel Relative to the Subject
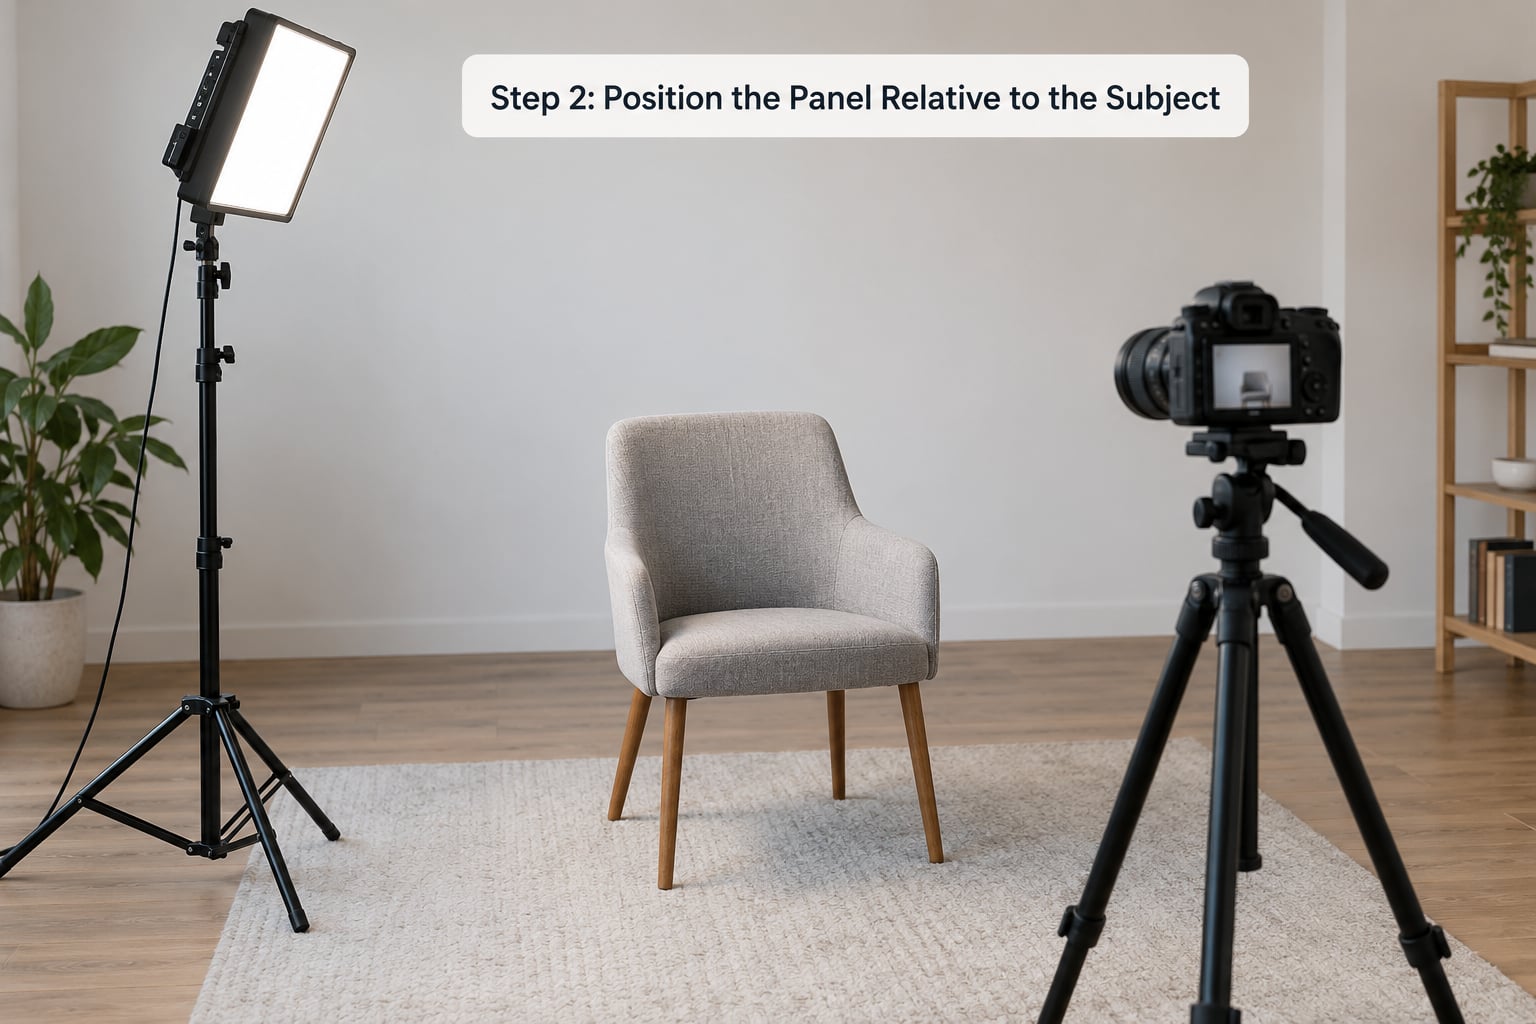
Place the panel roughly 45 degrees to one side of the camera axis and a little above eye level, about 3 feet from the subject. That angle shapes the face and drops a small shadow on the shadow side. Move the panel toward the camera axis and the face flattens into even, low-contrast light.
Pull the panel closer for crisper texture and stronger contrast; push it further back and the source appears larger, so shadows soften and falloff eases up. Watch the catchlights in the eyes. A rectangular catchlight means the panel is doing the lighting, which is a good baseline for a repeatable setup.
Step 3: Create Soft, Controlled Light
Run the panel bare for definition, then add diffusion when you want skin texture calmed down. A fitted diffuser or a thin white softbox panel is enough for most portrait work, and a larger diffusion surface on a separate frame gives you more wrap without moving the stand.
Glare is the common side effect. If your subject wears glasses, angle the panel so its reflection misses the lens, and shift the panel up until the glare slides off the top of the frame. Nylon diffusers soften while keeping some crispness; silks and large diffusion frames soften more but eat brightness.
Step 4: Balance the Panel with the Room
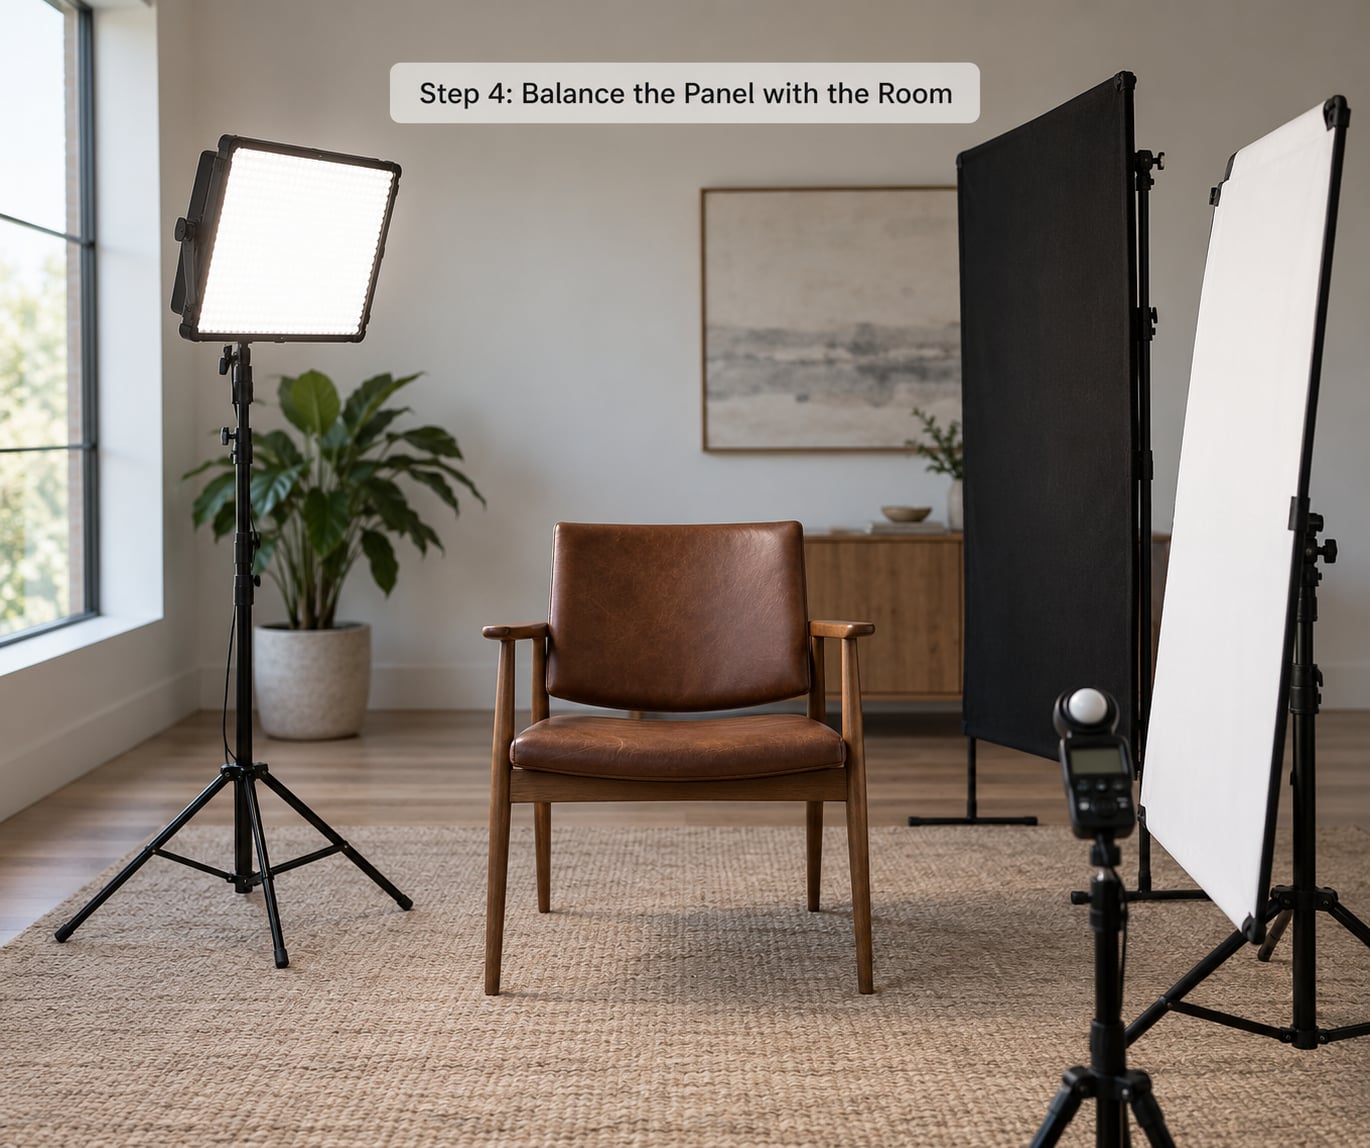
Turn off every lamp you can and close blinds that blow out the background. Then add a white reflector on the shadow side to lift it, or a black foam core just out of frame to deepen it and add negative fill. That one swap between white and black is how you move from a bright commercial look to a low-key portrait without changing a single camera setting.
Keep the room simple. Room light you cannot control is the reason exposures never quite repeat, and repeated exposures are what make a portrait session feel fast.
Step 5: Set Camera Exposure and Focus
With the panel as your only light, start around f/4, 1/125 second and ISO 400, then let the histogram pull you to a real exposure. Panels put out less light than strobes, so ISO climbs faster than you would expect and noise shows up in the shadows before it shows up on screen.
| Portrait type | Aperture | Shutter | ISO |
|---|---|---|---|
| Head and shoulders, panel is the only light | f/4 | 1/125 s | 400 to 800 |
| Waist up, two panels | f/5.6 | 1/160 s | 200 to 400 |
| Group or full length | f/5.6 | 1/200 s | 400 to 800 |
| Beauty, maximum softness | f/2.8 | 1/125 s | 400 |
Focus on the nearer eye and switch to single-point or eye-detection autofocus if your camera has it. Shoot RAW so you can correct a color cast later, and meter off skin rather than off a white shirt.
Step 6: Check the Portrait and Refine
Zoom in and look at four things: highlight detail on the forehead and cheekbones, whether the shadow side holds detail or has gone black, whether skin still reads as skin, and whether the subject separates from the background. Small moves beat big ones, so nudge the panel a few inches or take it half a stop down rather than rebuilding the setup.
Write down the Kelvin, brightness percentage, distance and camera settings that worked. Next session you start there and spend your time on posing instead of on exposure.
Common Mistakes
- Overpowering the fill. Aim for one to two stops under the key. If the shadow side disappears, your fill is too strong.
- Leaving white balance on auto. Mixed household bulbs will drag the color around. Shoot a grey card and set the Kelvin manually.
- Standing the panel too close. Close placement gives a small apparent source, hard shadows and fast falloff across the face.
- Chasing softness with diffusion only. Diffusion helps, but a larger apparent source helps more. Move the panel back before you add another layer of fabric.
- Ignoring flicker at low brightness. Some panels pulse through pulse-width modulation. Test yours before a paid shoot by shooting a grey card at your slowest shutter and checking for banding on the back of the camera.
- Trusting a panel with poor color rendering. Low CRI panels make skin look flat or green. Look for CRI 95 or better when you can.
- Forgetting the panel heats the room. LEDs run cool for the photographer, but hours of continuous output still warm a small space. Airflow keeps the panel stable.
- Adding a third light before the first two work. Long-term users in lighting forums run three or four bi-color panels for years, but they still start every setup with one key and a reflector.
Two habits speed everything up. Keep the panel settings fixed between looks so each change you make is a change of position, not a change of exposure. And shoot a test frame every time you move a stand; a ten-second check beats a full reshoot after the subject has relaxed.
Frequently Asked Questions
What is the basic light setup for portraits?
The basic setup is one key light, one fill and one background or hair light. Place the key about 45 degrees to one side of the camera and slightly above eye level, keep the fill on the opposite side one to two stops weaker than the key, and put a third light behind the subject for separation. One light plus a reflector does most of the same work.
How do I set up key light and fill light with LED panels?
Put your main panel on a stand at 45 degrees to one side of the camera, a little above eye level, around 3 feet from the subject. On the opposite side, place a white reflector close to the subject or a second panel further away and dimmed one to two stops under the key. Match both panels to the same Kelvin value before you compare brightness.
What is a disadvantage of using LED lights in photography?
The main drawbacks are power and precision. Panels put out far less light than strobes, so you raise ISO and pick up noise in the shadows. They are also hard to push to true hard light, since the panel face stays broad. They also run warm in a closed room and some cheap models flicker when dimmed low.
How far should an LED panel be from my subject?
For a head-and-shoulders key, start about 3 feet from the face and adjust. Closer gives more contrast, faster falloff and a smaller apparent source. Further back looks softer and holds more even light across the face, but needs more output. Fill panels sit further away than the key, and reflectors sit just inches from the subject.
Can LED panels give soft light, and how do I make a panel softer?
Yes, but softness depends on apparent source size rather than wattage. Move the panel further from the subject, fit a diffuser or softbox, or bounce it off a white ceiling or wall, which makes the source far larger without extra gear. Glare on glasses is easier to fix by raising or angling the panel than by adding diffusion.
What color temperature should I set an LED panel to for portraits?
Set the panel and your camera white balance to the same value, usually 5000K to 5600K for daylight-balanced portraits. Match it to the room if practical lights stay on, otherwise switch them off. Shoot a grey card in the first frame, then leave the camera in manual so the color does not drift between looks.
Conclusion
Start with four actions. Dial the panel to one Kelvin value and match your camera white balance to it with a grey card. Put the panel on a stand at 45 degrees to one side, a little above eye level, about 3 feet from the subject. Add a white reflector on the opposite side, one stop under the key, and switch it to black foam core when you want more contrast. Then set f/4 at 1/125 second, adjust ISO until the histogram sits where you want it, and check the catchlights and shadow side before you shoot the portrait properly.
Write the numbers down, then repeat them. That repeatable setup is the whole reason to learn how to use LED panels for portraits, and once it is in your hands the rest of the work is about light direction rather than gear.