Frequency separation splits a portrait into two layers so you can fix color and tone on one without erasing skin texture on the other. Setting it up takes about five minutes, needs no plugin, and works on any image in Photoshop CC or later. Start from a duplicated layer, blur the low-frequency copy, then run Image > Apply Image on the copy above it.
Here is what the split actually gives you:
- High-frequency layer holds the fine detail: pores, hair, fine lines, freckles and blemishes.
- Low-frequency layer holds the broad information: tone, color, shadows and gradients.
Separating the two is what stops you from scrubbing a blotchy patch and taking the skin texture with it. The steps below work in Photoshop on both Mac and Windows, and the menu paths are the same whether you are on a subscription or a standalone install.
Table of Contents
- What You Need
- Step-by-Step: How to Use Frequency Separation in Photoshop
- How to Use Frequency Separation in Photoshop Step 1: Prepare the Image
- How to Use Frequency Separation in Photoshop Step 2: Create the Low-Frequency Layer
- How to Use Frequency Separation in Photoshop Step 3: Create the High-Frequency Layer
- How to Use Frequency Separation in Photoshop Step 4: Correct Color and Tone
- How to Use Frequency Separation in Photoshop Step 5: Refine Texture and Details
- How to Use Frequency Separation in Photoshop Step 6: Check the Final Result
- Common Mistakes
- Frequently Asked Questions
- What is the best blur radius for frequency separation in Photoshop?
- How many layers are needed for frequency separation?
- Should I use frequency separation on the high-frequency or low-frequency layer?
- Can I use frequency separation on skin with freckles or acne marks?
- Why does my frequency separated portrait look blurry or plastic?
- Is frequency separation better than using the Spot Healing Brush?
- Conclusion
What You Need
You need Photoshop (Camera Raw alone will not do this), one portrait or texture-heavy photo, and about five minutes. There is nothing to buy. Free actions exist that run these steps for you, but learning them once by hand is what stops the setup from being a black box.
Before anything else, check the bit depth. Go to Image > Mode > 8 Bits/Channel or 16 Bits/Channel. The Apply Image recipe in Step 3 is different for each one, and using the 8-bit numbers on a 16-bit file is the single most common reason beginners get a flat, grey-looking layer.
Three layers end up in your panel once you are done: the original Background at the bottom, a Low Frequency layer, and a High Frequency layer grouped with it. That original stays untouched the whole time, which is why the technique is non-destructive.
As far as skills go, you should be comfortable duplicating and renaming layers, using Gaussian Blur, and picking a blend mode from the dropdown. That is genuinely it. If you can do those three things, you can do this.
Step-by-Step: How to Use Frequency Separation in Photoshop
How to Use Frequency Separation in Photoshop Step 1: Prepare the Image
Open your image and convert the Background layer to a Smart Object by right-clicking it and choosing Convert to Smart Object. That keeps the filters you are about to apply non-destructive, so you can reopen the Smart Object later and change the blur radius without rebuilding the stack.
Duplicate the layer with Ctrl+J (Cmd+J on Mac) twice. Rename one copy High Frequency and the other Low Frequency. Select both, group them with Ctrl+G (Cmd+G), and rename the group something you will recognise later. Leave the original Background layer underneath, unhidden.
Order matters: High Frequency on top, Low Frequency underneath, Background at the bottom. If you stack them the other way round, nothing you paint will show up.
How to Use Frequency Separation in Photoshop Step 2: Create the Low-Frequency Layer
Select the Low Frequency layer and open Filter > Blur > Gaussian Blur. Blur until all the fine texture disappears and you are left with soft gradients of tone and color. That is the whole test: no pores, no hair, no visible detail, just the light and shadow shapes of the face.
There is no single correct radius, because it depends on how tightly you cropped. Match the number to your framing:
| Framing | Gaussian Blur radius | What it should look like when done |
|---|---|---|
| Close-up portrait (face fills the frame) | 6-8 pixels | Smooth gradients, no pores at all |
| Medium portrait (head and shoulders) | 3-5 pixels | Shape and shadow remain, texture gone |
| Full-length portrait | 1-3 pixels | Body tones soft but still readable |
Under-blurring is the safer error. If texture is still faintly visible when you zoom in, tighten the blur a little more. Over-blurring quietly destroys the medium-sized details too, which is why people on Reddit describe the step as a band stop rather than a simple blur.
Two alternatives work if Gaussian Blur is giving you trouble. Surface Blur (Filter > Blur > Surface Blur) preserves edges better on hard-edged subjects like fabric and product shots. The Median filter (Filter > Noise > Median) is aggressive and fast on small areas such as a single cheek.
How to Use Frequency Separation in Photoshop Step 3: Create the High-Frequency Layer
Select the High Frequency layer, then go to Image > Apply Image. In the Layer field, choose Low Frequency. Set the rest of the options from the table below, then click OK.
| Setting | 8 Bits/Channel | 16 Bits/Channel |
|---|---|---|
| Layer | Low Frequency | Low Frequency |
| Channel | RGB | RGB |
| Blending | Subtract | Add |
| Scale | 2 | 2 |
| Offset | 128 | 0 |
| Invert | Leave unchecked | Checked |
Your High Frequency layer will turn a flat mid-grey. That is correct, and it looks alarming the first time. The layer now holds only the difference between the original and the blurred version, and grey means zero difference.
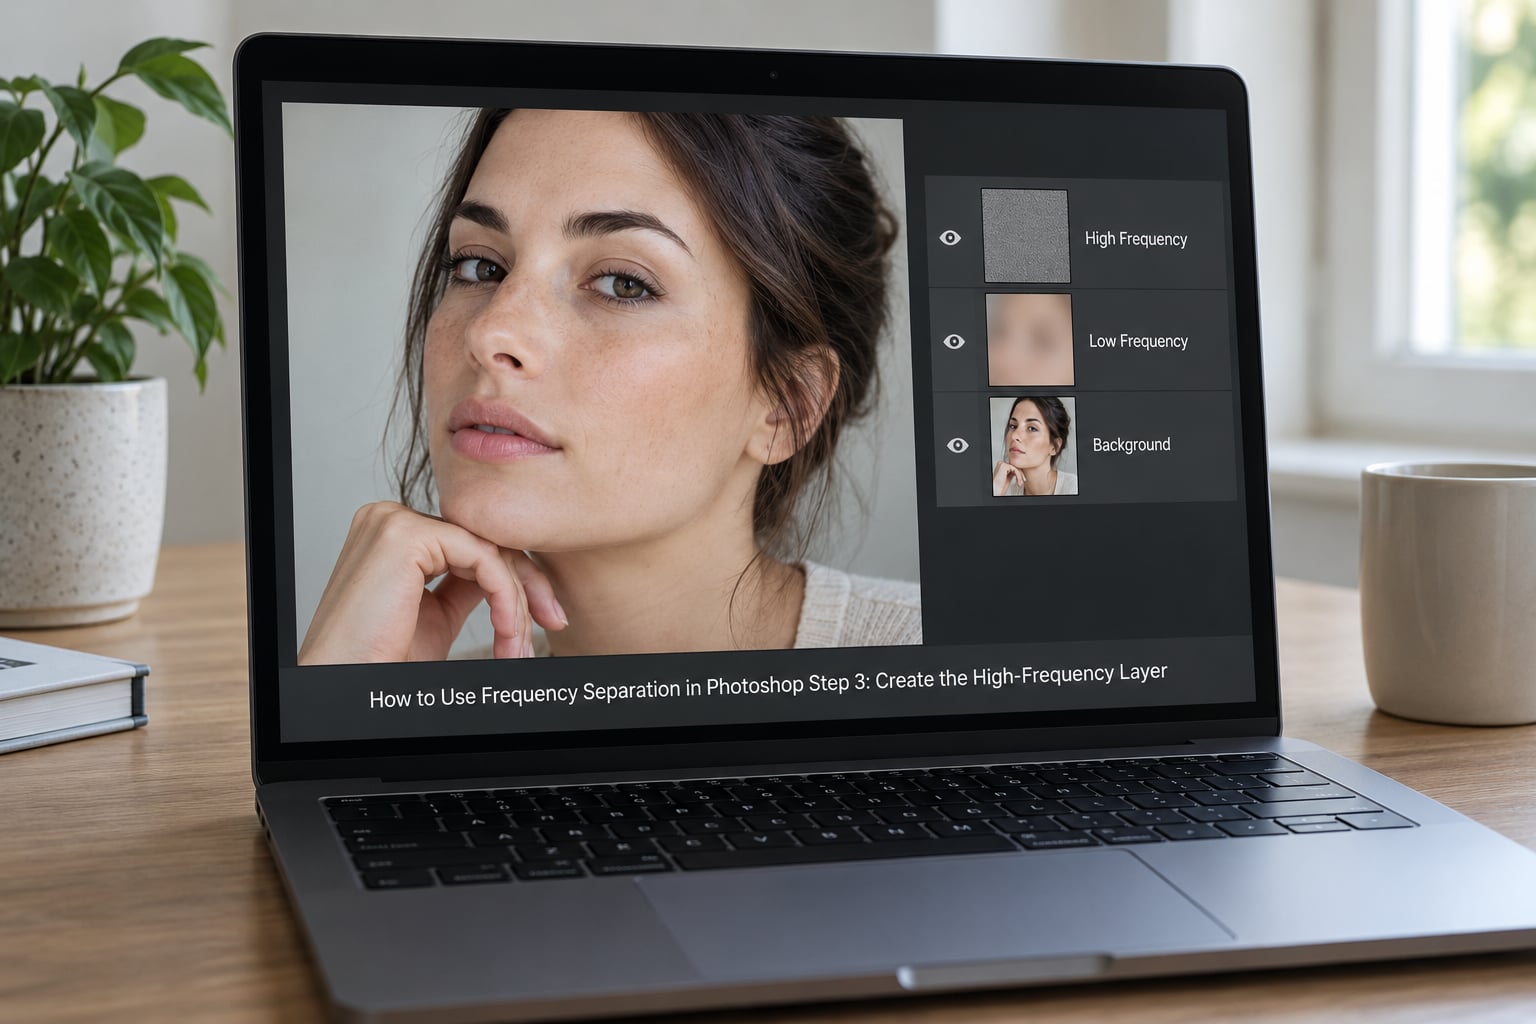
Set the High Frequency layer blend mode to Linear Light, found in the bottom group of the blend mode dropdown. The stack should snap straight back to looking like the original photo. If it does not match exactly, your Apply Image settings are wrong, and now is the time to find out rather than after you have painted on it.
One more check before retouching: click the eye icon on the group to hide it, confirm you are seeing the untouched original, then click it back on. If the two do not match pixel for pixel, redo the Apply Image step.
How to Use Frequency Separation in Photoshop Step 4: Correct Color and Tone
All color and tone work happens on the Low Frequency layer. Load a soft round brush, drop the opacity to around 5 to 10 percent, and set Flow to a low value too. Small, slow strokes on a soft brush keep the correction invisible.
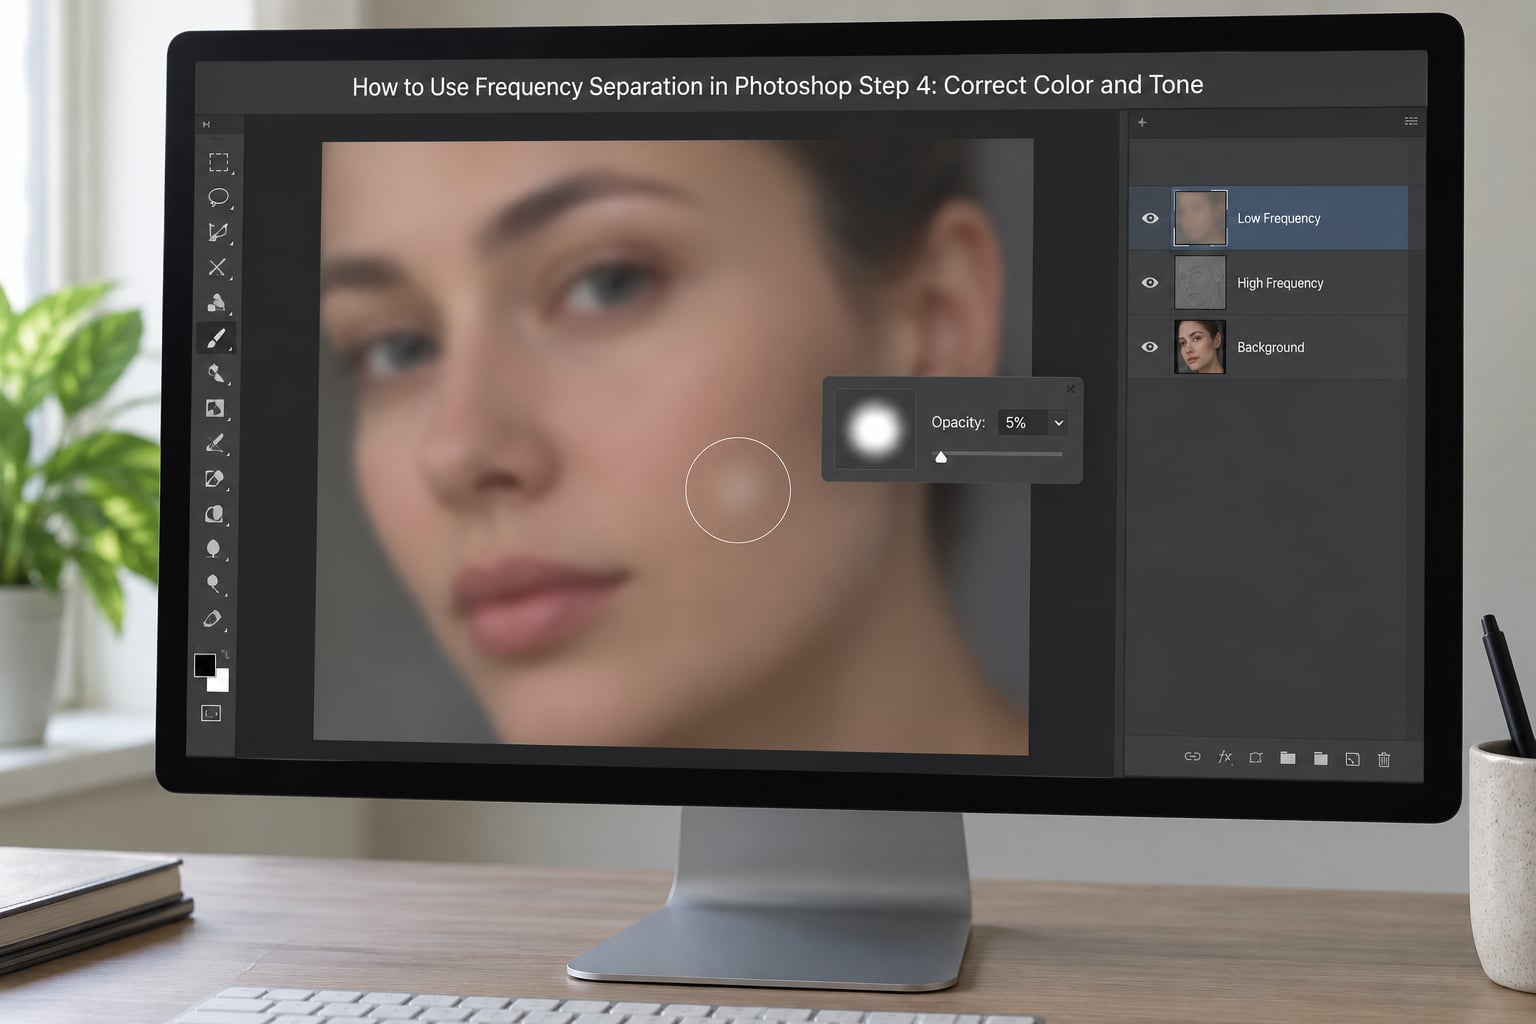
Two settings save you from the blotchy patches people complain about online. Set the brush to Sample: Current Layer so the color you pick up is the blurred tone rather than a pore or a blemish on top. And keep an eye on the shape of the face as you go: if the shadow under the cheekbone starts disappearing, you have pushed too far.
For even blotchiness, add a new layer above the Low Frequency layer, fill it with 50 percent grey, set the blend mode to Soft Light, and paint on that instead. It is slower to set up but far easier to reduce back down with the layer opacity slider when you overdo it.
The Mixer Brush is the tool most people reach for here. Wet 40, Load 20, Mix 20, Flow 20, Clean the Brush after Each Stroke ticked, and Sample All Layers on. That combination smooths tone without the smeary look you get from dragging a soft brush across the same spot twice.
Sample the cheek, not the forehead. Skin tone shifts across a face, and pulling color from the wrong area is what makes retouched skin look grey and lifeless.
How to Use Frequency Separation in Photoshop Step 5: Refine Texture and Details
Texture work goes on the High Frequency layer, and here the tools change. Use the Healing Brush or Clone Stamp for blemishes, wrinkles and stray hairs. Set Sample to Current Layer, which pulls clean skin from the high-frequency layer itself instead of dragging the blurred low-frequency data across your work.
Sample: Current Layer is the setting that prevents halos. If you leave it on All Layers, the Healing Brush pulls color from the Low Frequency layer underneath and paints a soft grey ring around everything you touch.
Wrinkles should be softened, not deleted. Press the Alt key to sample just beside the line, then reduce the layer opacity to 50 percent so the original shadow is still doing some of the work. Pores stay as they are; removing them is the single biggest step toward the plastic look people complain about in retouching forums.
For broad light and shadow, dodge and burn on a Curves layer over the whole group. That handles shape and volume better than painting tone by hand, and it keeps the natural variation in the skin.
How to Use Frequency Separation in Photoshop Step 6: Check the Final Result
Step back to fit the whole image on screen at around 100 percent, then toggle the group off and on. Flip between the two states a few times. Your eye is much better at catching a difference when it alternates than when it stares at a finished file.
Look for four things: dark or light halos around the eyes and jaw, brush marks that show as streaks when zoomed in, patches of skin that look smoother than the surrounding area, and any loss of the light and shadow pattern that gave the face its shape.
Found a problem you cannot paint out? Drop the group opacity to 60 or 70 percent. A strong correction eased back often looks better than a small correction gone wrong. If texture still looks wrong after that, the blur radius was wrong at Step 2 and no amount of painting on top will fix it.
Common Mistakes
The high-frequency layer looks grey. That is normal before you set Linear Light, and it is also normal if you are on a 16-bit file using the 8-bit Apply Image settings. Check the bit depth and the Offset value together.
The whole image looks washed out or too bright. Your Scale and Offset are off, or the blend mode is set to something other than Linear Light. Confirm the stack matches the original before doing any retouching.
Skin looks waxy or plastic. You over-smoothed it. Most often the low-frequency layer got too much work and the high-frequency layer got cleaned too aggressively. Cut both back with the group opacity slider and leave some pores alone.
The face lost its volume. You evened out shadows that were carrying the shape of the face. Pull back on the low-frequency layer and correct only the blotches, not the modelling.
Halos around blemishes and eyes. The Healing Brush is set to Sample: All Layers. Switch it to Current Layer and the rings disappear.
Blotchy, uneven patches after color work. Usually an opacity problem or a brush picking up the wrong sample. Lower the opacity, set Sample: Current Layer, and take color from a cheek rather than a forehead.
Detail lost everywhere after the blur. The radius was too large for the framing. Check the table in Step 2 and rebuild with a smaller number.
One question comes up constantly on Reddit and it is worth answering directly: is frequency separation a required step? Most experienced retouchers there treat it as a tool, not a finish. They reach for it when a job needs texture cleanup held separate from tone, and reach for dodge and burn when shape and volume are the problem. Running both gives you more control than either one alone.
It also works outside portraits. On product shots, run a small blur and use the low-frequency layer to even out reflections or color casts on a surface. On textures, labels and documents, the high-frequency layer is a clean way to lift marks without disturbing the shape underneath.
Once you have done it a few times, save the whole setup as an Action. Open the Actions panel (Alt+F9 on Windows, Option+F9 on Mac), create a new action, hit Record, run the steps once on your next image, then Stop. From then on it is one click at the start of every retouch.
Frequently Asked Questions
What is the best blur radius for frequency separation in Photoshop?
There is no single correct number, because it depends on how tightly you cropped. For a close-up portrait where the face fills the frame, start at 6 to 8 pixels. For a head-and-shoulders shot, 3 to 5 pixels. For a full-length portrait, 1 to 3 pixels. Blur until no pores or hair remain visible and only soft gradients of tone and color are left. If faint texture survives at 100 percent zoom, go a little further.
How many layers are needed for frequency separation?
Three layers end up in your panel: the original Background at the bottom, a Low Frequency layer holding tone and color, and a High Frequency layer holding texture, grouped with it. The original is never modified, which is what makes the whole technique non-destructive. You can hide the group at any point to compare against the untouched file.
Should I use frequency separation on the high-frequency or low-frequency layer?
Color, tone, shadows and blotchy patches belong on the Low Frequency layer, using a soft brush at low opacity. Blemishes, wrinkles, stray hairs and anything to do with texture belong on the High Frequency layer, using the Healing Brush or Clone Stamp with Sample set to Current Layer. If you try to fix tone on the high-frequency layer nothing changes, because that layer holds no tone data.
Can I use frequency separation on skin with freckles or acne marks?
Yes, and it is one of the technique’s strengths. Freckles sit on the high-frequency layer, so heal or clone the ones you want gone while the low-frequency layer keeps the natural color variation underneath. Acne marks work the same way: repair the texture on the high-frequency layer and correct any leftover redness or shadow on the low-frequency layer. Work gently, since heavy-handed cleanup on either layer is what produces the waxy look.
Why does my frequency separated portrait look blurry or plastic?
Almost always because the correction was too strong, not because the setup was wrong. Blurring too much, painting the low-frequency layer at full opacity, or cloning away every pore removes the variation that makes skin look real. Drop the group opacity to 60 or 70 percent to dial the whole retouch back, and remember that frequency separation cannot fix lighting or facial structure, only the surface.
Is frequency separation better than using the Spot Healing Brush?
They solve different problems. The Spot Healing Brush is faster for scattered blemishes on a high-resolution image, but it blends across the whole stack and can drag tone and color with it. Frequency separation is slower to set up and gives you two independent layers, so you can correct tone without touching texture and repair texture without shifting shadows. On small jobs the Spot Healing Brush is fine; on a full portrait retouch the separation gives you more control.
Conclusion
Start by opening a portrait as a Smart Object and checking Image > Mode, because the bit depth decides which Apply Image numbers you use. Everything after that is the same every time.
To recap how to use frequency separation in Photoshop: duplicate the layer twice, convert to a Smart Object first if you can, blur the Low Frequency copy until no texture survives, run Apply Image with the settings for your bit depth, set High Frequency to Linear Light, and confirm the stack matches the original before you touch anything. Then keep tone work on the low layer, texture work on the high layer, and both of them subtle. Most of the disappointing results I have seen come from correcting too hard, not from setting it up wrong.
Practise it on a copy. Once the sequence feels automatic, record it as an Action and it becomes part of every retouch rather than a chore.